This guide will show you step-by-step how to use a single component in your project. For our example we'll use the console component.
Symfony 2 boasts interoperability above all else, dividing its building blocks into individual componenets. Unfortunately, if you've tried using any of its components apart from the framework, you've probably discovered that while the documentation explains how each component works, there is no clear documentation that shows how to use each of the Symfony components as they were meant to be used - as stand-alone components… Let's fix that.
Setting Up The Console Component Using Composer
The easiest way I've found to drop a Symfony component into your project, is with Composer.
Let's start by downloading composer into our project dir:
curl -O http://getcomposer.org/composer.phar
chmod +x composer.phar
Let's make sure composer runs correctly by running it in the command line:
./composer.phar
You should be greeted by composer's help, and a list of available commands and options.
If composer doesn't run, try calling it with the php command line interface (i.e. php ./composer.phar)
Now let's tell composer about our project's dependancies, in this case, the Symfony console componenet. The way we do this is by creating a composer.json file, and placing it in the root folder of our project, right next to composer.phar
{
  "require": {
    "symfony/console": "2.*"
  }
}
Let's let Composer work its magic:
./composer.phar install
Composer will download all the dependencies defined in composer.json, and prepare all the files needed to autoload them. In our case, we've asked it to find and download symfony/console's latest 2.* version.
You can use composer to require any package found in the Packagist repository, in custom repositories you define, or your own packages.
Let's look at the current state of our project:
.
├── composer.json
├── composer.lock
├── composer.phar
└── vendor
    ├── .composer
    │   ├── ClassLoader.php
    │   ├── autoload.php
    │   ├── autoload_namespaces.php
    │   └── installed.json
    ├── bin
    └── symfony
        └── console
            └── Symfony
                └── Component
                    └── Console
                        ├── Application.php
                        ├── Command
                        │   ├── Command.php
                        │   ├── HelpCommand.php
                        │   └── ListCommand.php
                        ├── Formatter
                        │   ├── OutputFormatter.php
                        │   ├── OutputFormatterInterface.php
                        │   ├── OutputFormatterStyle.php
                        │   └── OutputFormatterStyleInterface.php
                        ├── Helper
                        │   ├── DialogHelper.php
                        │   ├── FormatterHelper.php
                        │   ├── Helper.php
                        │   ├── HelperInterface.php
                        │   └── HelperSet.php
                        ├── Input
                        │   ├── ArgvInput.php
                        │   ├── ArrayInput.php
                        │   ├── Input.php
                        │   ├── InputArgument.php
                        │   ├── InputDefinition.php
                        │   ├── InputInterface.php
                        │   ├── InputOption.php
                        │   └── StringInput.php
                        ├── LICENSE
                        ├── Output
                        │   ├── ConsoleOutput.php
                        │   ├── ConsoleOutputInterface.php
                        │   ├── NullOutput.php
                        │   ├── Output.php
                        │   ├── OutputInterface.php
                        │   └── StreamOutput.php
                        ├── README.md
                        ├── Shell.php
                        ├── Tester
                        │   ├── ApplicationTester.php
                        │   └── CommandTester.php
                        └── composer.json
Using the Console Component
If you look at our project, you'll see that Composer not only downloaded the console component, but also created a folder called .composer with a bunch of files that will do all the magic of autoloading the Console classes for us (as well as our own classes, once we expand our composer.json).
The most important of the generated files is autoload.php and by requiring it in our own files, we can take advantage of the console component. So let's do just that…
We'll create a file called console.php in our project root:
<?php
require_once('vendor/.composer/autoload.php');
use Symfony\Component\Console\Application;

$console = new Application();

$console->run();
That's it, simply run the new console.php file from the command line:
php console.php
If you followed everything closely, you should be greeted by the console component's list of default commands and options.
That's it! You can now register your commands, and get to the real work of building your application (with the help of the official documentation here and here.)
Extended Sample
Here's a sample console.php with some more functionality:
<?php
require_once('vendor/.composer/autoload.php');
use Symfony\Component\Console\Application;
use Symfony\Component\Console\Input\InputInterface;
use Symfony\Component\Console\Input\InputArgument;
use Symfony\Component\Console\Input\InputOption;
use Symfony\Component\Console\Output\OutputInterface;
$console = new Application();
$console
->register('say:hello')
->setDefinition(array(
new InputArgument('person', InputArgument::OPTIONAL, 'Who shall we greet?', 'world'),
))
->setDescription('Greet someone.')
->setHelp('
The say:hello command will offer greetings.
Samples:
To run with default options:
php console.php say:hello
To greet someone specific
php console.php say:hello
')
->setCode(function (InputInterface $input, OutputInterface $output) {
$person = $input->getArgument('person');
$output->writeln('Hello '.$person.' ');
});
$console->run();
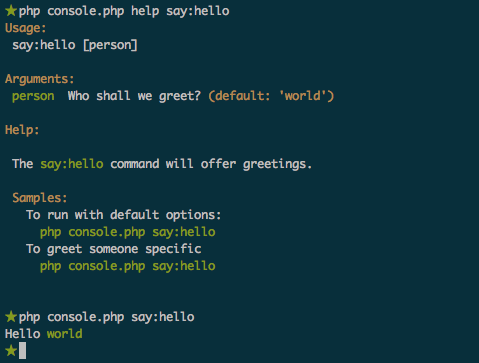
Our simple console command is ready for action: